We are getting close to the year end so what is more natural at this time of the year than blog about tasks that we typically perform as a part of our year end procedures? Traditionally one of those are physical inventory counting.
I must admit that I advocate for cycle counting of smaller parts of your inventory on a regular basis through the year instead of doing one large physical inventory at the end of the year. But I can return to that topic in a later post.
In this blog post we will look at the two easiest and most common ways of doing physical inventory adjustments in Business Central.
Let us start with a function that was not present in the first versions of Dynamics NAV (not sure what version it was introduced in) but is now available in Business Central.
Preparations you should do before you do inventory adjustments or inventory counting in Business Central.
- Make sure you have posted all incoming and outgoing deliveries that will effect the quantity in the locations you will be counting. This is done to assure that the all physical movement of inventory are reflected in Business Central at the time of your inventory counting or adjustments.
- Make sure to inform the users that you are going to do inventory and tell them not to post any transactions during that period that may influence on the inventory results.
- Consider if you should close the system for posting by going to the “General ledger setup” and adjust the posting allowed from and posting allowed to dates. If there are users that needs to be allowed to post financial transactions during the inventory you can register exceptions for them in the user setup.
- When you use the physical inventory journal – try to make sure you use the shortest time possible from generating to journal to register and posting the result. Having open physical inventory journal for days is not a good practice – instead created journals covering smaller portions of your inventory.
Adjust inventory directly from the item list or the item card
This is by far the easiest way to adjust your inventory because it is available directly from the item list and the item card. This means that you also can do this without going through the Physical Inventory Journal or any other item journal. But there are some limitations to this function – you can not use it for inventory on locations that are defined with bins. If you use locations with bins you need to use the journals to adjust your inventory.
From the item list you find this function under Item, Adjust inventory.

This will show you a list of the current qty. on hand for all your locations. And if you have counted your physical inventory you can use the column “New inventory” to register the correct physical inventory on that specific location or for several locations at the time.
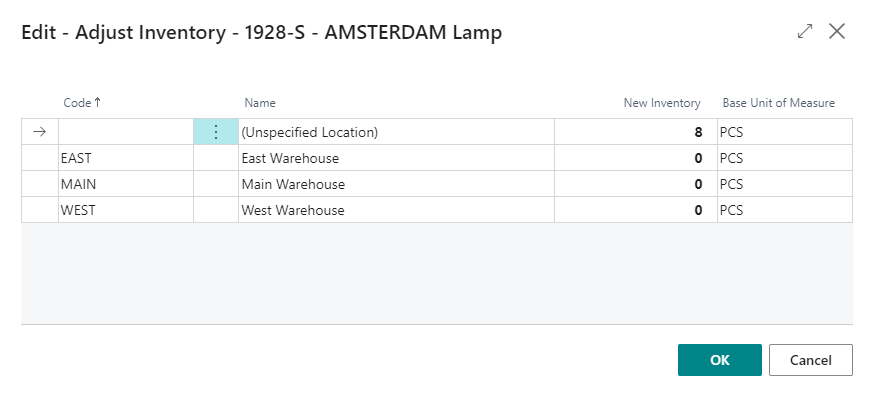
In our example we will adjust the inventory for our item 1928-S Amsterdam Lamp for the unspecified location from 8 to 10. So in the “New Inventory” column for the unspecified location i change 8 (my current qty.) to 10 that is the qty. on hand according to the count i just did in my warehouse. And i hit OK to go post the adjustment.
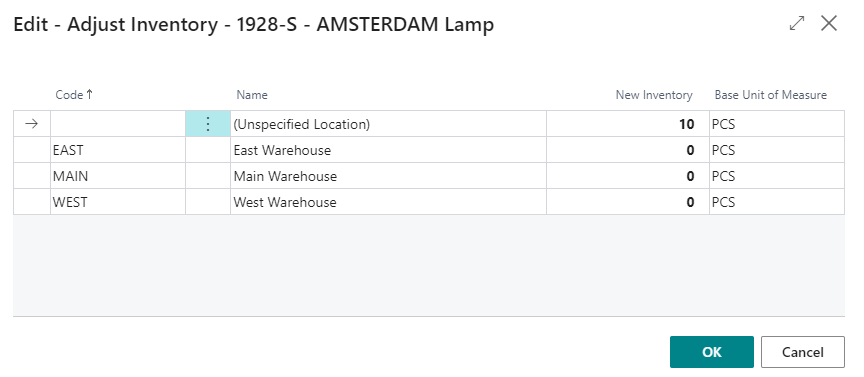
What actually happens when I hit OK is that an item journal is posted in the background. And when Business Central returnes to the item list we can see that the “Quantity on hand” is showing 10 instead of 8 as it did before we did this adjustment.

And if we look at our Item Ledger Entries we can see that there now is posted a positive adjustment of 2 on the date we had as our work date in Business Central.

One thing you should be aware of when you use this method is that this will not update the “Last Phys. Invt. Date” field in the Item table like it would do if we use the physically inventory journal.

As we can see the field is still blank after adjusting the inventory directly from the Item list or Item card.
Using the Physical Inventory Journal for inventory counting
The more traditional way of doing inventory is through the Physical inventory Journal.

Even though this journal pretty much looks like any other item journal in Business Central you can not use this journal by manually typing in information about the items you have been counting. Trying to do so will result in an error message. So it is important to remember that you need to prepare the lines in this journal before you can type anything in it.
To start preparing lines in the journal you go to “Prepare”, “Calculate inventory”.

Doing so will open a request page where you can select the items you want to prepare for physical counting.
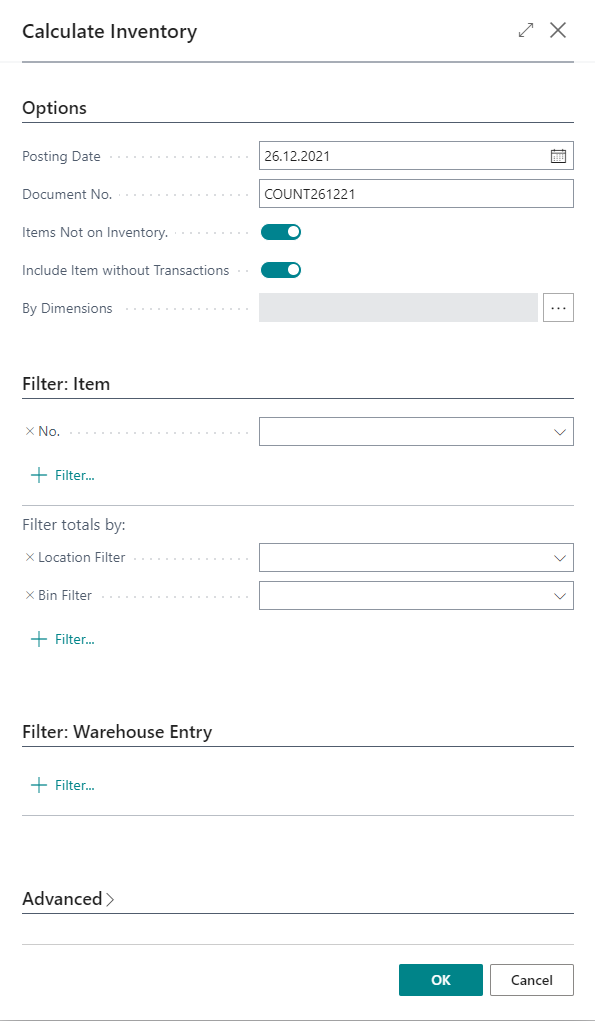
Remember to register the date of the actual counting as the posting date and assign a Document No. to the counting.
Then there is two switches you can chose to activate. “Items Not on Inventory” and “Include Item without Transactions”.
The “Items Not on Inventory” will also include items where the qty. on hand according to the system is equal to zero for items that there have been transactions on in the system.
The other one: “Include Item without Transactions” will also include items that are registered in your item register but there have never been any transactions at all on these items.
I have activated both those switches in my example for this post.
In the filter section you can add filters on the item table to further refine the items you have selected for counting at this point. In this example I leave my list unfiltered. When we hit OK in this request page the system will start to calculate the quantity on hand for every combination of Item,location, bin and so on and present the result in the journal like you see below.

If you are doing your physical inventory on a mobile device you can pretty much use this journal and walk around your warehouse facility and register the result of your counting in the
“Qty (phys.inventory)” column.
If you want to do it the more traditional way you can make a print of a Physical Inventory List. To print out that go to the “Post/Print” action on your ribbon and select “Print”

This will bring up the request page for the Physical Inventory List where you can make some selections and put a filter on the item journal lines that you want to print.
The most important switch here is the “Show Qty.(calculated) switch. This switch decides if the quantity calculated by the system will show on the print or not. Some prefer to do a “blind” count where the operator does not know the quantity that the system thinks is in stock. But others think it is ok for the operator to know the expected quantity when they count. In this example I have turned it off so I will not see the expected quantity on my print.

Based on my selections I will get a print similar to this:
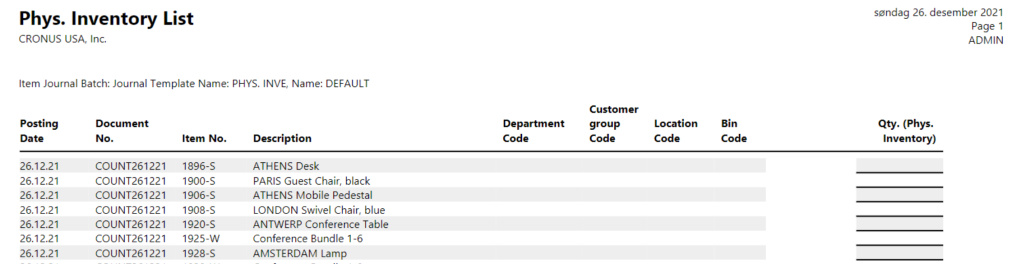
And I can use this list and walk around my warehouse, count each item and note the quantity counted in the right most column on my report. And when the physical counting is completed I can take it back to my computer and register the result in the journal we prepared earlier.
The result of the physical counting should be registered in the column “Qty (Phys. Inventory). Then the system will calculate the Quantity column to show the difference between the calculated and actual qty. on hand.

As you can see above I have adjusted the qty. of the ANTWERP Conference Table from 10 to 8. The rest of the items I have accepted the calculated qty. as the physical inventory after counting.
So when I have completed my registration I post and print this journal (shift+F9). Then I will get a print of a posted journal showing me what adjustments have been done as a result of my counting.

As we can see the print only shows the items I adjusted and not all the ones where there was no differences.
And if we now look at the item card under warehouse:

We can see that the system have updated the “Last phys. inv. Date” to reflect the date this item last was counted. This date will be updated on all the items in the journal not only those with a difference. That makes it easier to filter on items not yet counted when we are going to do our next counting of inventory.


[…] just to be on the safe side. I would also recommend that you run the manual process before you do physical inventory adjustments or item […]
LikeLike
I am not sure what manual process you are referring to here. Are you talking about the cost adjustment?
LikeLike
Wow! I found your pages on Microsoft. Your writing is very clear and impressive.. Thanks for posting……….
LikeLiked by 1 person
[…] to revaluationIn an earlier post I talked about doing physical inventory in Business Central. In this post we will talk about doing item […]
LikeLike
Wow! I found your information on Microsoft is very informative. Your writing is very clear and impressive. Its very easy to understand
Thanks for sharing this information.
LikeLike